Writing XML
Let's start our foray into XML by reading in our customers.csv, orders.csv and orderdetails.csv files. We will then write out some XML which contains each customer with associated orders nested below.
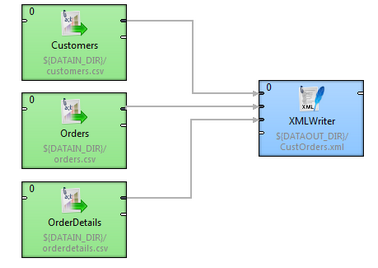
Take a look at the diagram below. This is reading data from the 3 files and simply feeding these into the XMLWriter component.
First of all, the only component properties we need to set for the XMLWriter are
| • | FileURL - the output file name. Note that there are some nice advanced properties that allow you to do clever things with output file creation. Read a but more about the File URL dialog in this section. |
| • | Mapping - this defines the relationships between the incoming datasets and we will describe this right now. |
So, how do we define the proper relationships between the 3 datasets? We use what Clover calls a "Mapping". "Mapping" is a visual definition of the output XML tree which binds metadata fields to XML nodes (elements, attributes and so forth).
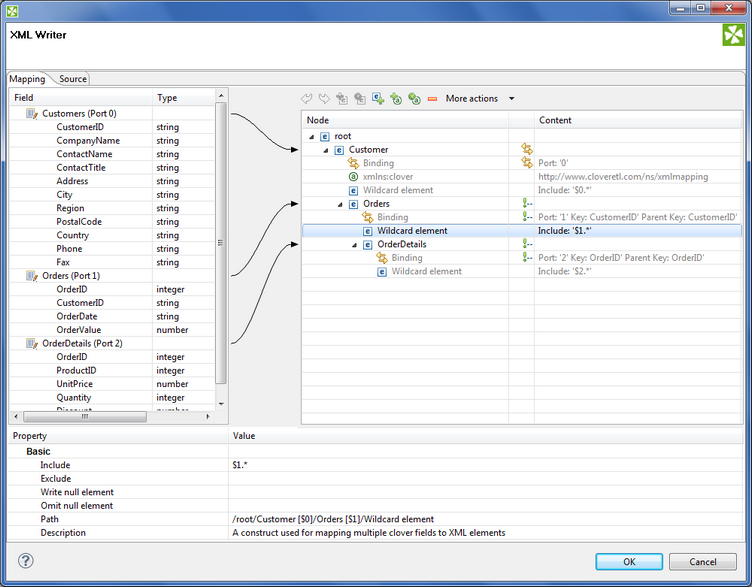
The key things to note here are
| • | Left-hand side pane represents the metadata (input), right-hand side is the XML being designed (output). |
| • | First, use toolbar buttons to design the desired structure of elements and attributes you want to write to the XML file. In wildcard elements/attributes, remember to specify the Include and Exlude properties to control which input fields will become elements/attributes of the output XML. |
| • | Second, drag ports and drop them on appropriate elements - this will create a Binding which actually drives the element to repeat itself with every record incoming from that port. Port numbers on the XMLWriter in ouf Graph are: Customers=0, Orders=1, OrderDetails=2. |
| • | Third, specify Keys and Parent keys of those elements where data from various sources (Orders, OrderDetails) needs to be joined. Key is the key field of the incoming data. Parent key specifies the key field in the parent element that links to its child. |
Besides designing the "Mapping" in the GUI, you can do it the other way - write its code in the "Source" tab. This is really just some simple XML that describes the relationships. The mapping we have designed in our graph visually is stored as this code:
<?xml version="1.0" encoding="UTF-8"?>
<root>
<Customer xmlns:clover="http://www.cloveretl.com/ns/xmlmapping" clover:inPort="0">
<clover:elements clover:include="$0.*"/>
<Orders clover:inPort="1" clover:key="CustomerID" clover:parentKey="CustomerID">
<clover:elements clover:include="$1.*"/>
<OrderDetails clover:inPort="2" clover:key="OrderID" clover:parentKey="OrderID">
<clover:elements clover:include="$2.*"/>
</OrderDetails>
</Orders>
</Customer>
</root>
Go to this Wiki link to get the lowdown on parameters for the XMLWriter. There are some useful features worth knowing about.
Run the graph and check the output format. You will see that Clover displays the XML nicely by breaking out the data into a treeview. You can also load the raw XML. Check out the video to see this in action.
|
[4:50] |
XML Writing |
Merge customers, orders and order details into an XML output file |