Now let's amend our Graph so it looks like the one below.

|
| 1. | Insert the "Reformat" component from the "Transformers" section of the toolbox and into the graph. |
| 2. | Connect the existing Edge (that was connected to Trash) to the input (left) port of the Reformat component. |
| 3. | Add a new Edge from the output of the Reformat command to the Trash. |
| 4. | Right click on the new edge and choose "Select Metadata" and select the "CustomerSummary" item. ALTERNATIVE: Drag the metadata from the "Metadata" pane and drop it onto the edge. |
|

You will notice that the Reformat component has a yellow '!' symbol on it. This is because it has not yet been properly configured. We will now set this up to map the fields from the file to the new format.
Now we will set up the field level mapping.

|
| 1. | Double click on the Reformat component to open the property window. |
| 2. | Select the Transform property and then press the '...' button at the end of that line. |
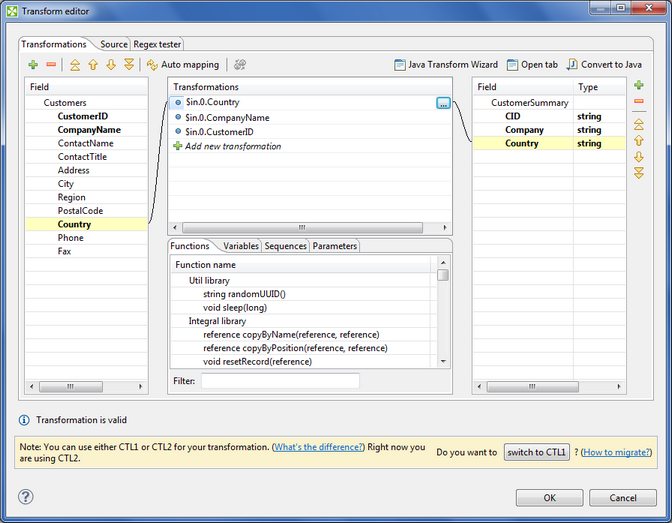
| 3. | You will now see a mapping dialog that allows you to define the actual field mapping. Note how it already knows what input and output formats are required as we mapped the Metadata to the the Edge connectors a moment ago. |
| 4. | There is a button "Auto mapping"  that automatically maps any fields with the same name. Press this button and it will only be able to map the "country" field. that automatically maps any fields with the same name. Press this button and it will only be able to map the "country" field. |
| 5. | Now let's add CustomerID and CompanyName by dragging them into the central "Transformations" pane. |
| 6. | To complete the mapping, drag each field in turn to the corresponding field in the output field list. MAC USERS : the Mac seems to be a bit quirky and does not let you drag from the middle pane to the output fields pane on the right. Drag instead from the right pane to the middle one. |
| 7. | If you click on any field in any pane, you should see the way that the field is mapped. |
| 8. | Leave the window open and read the next chapter. |
|


